
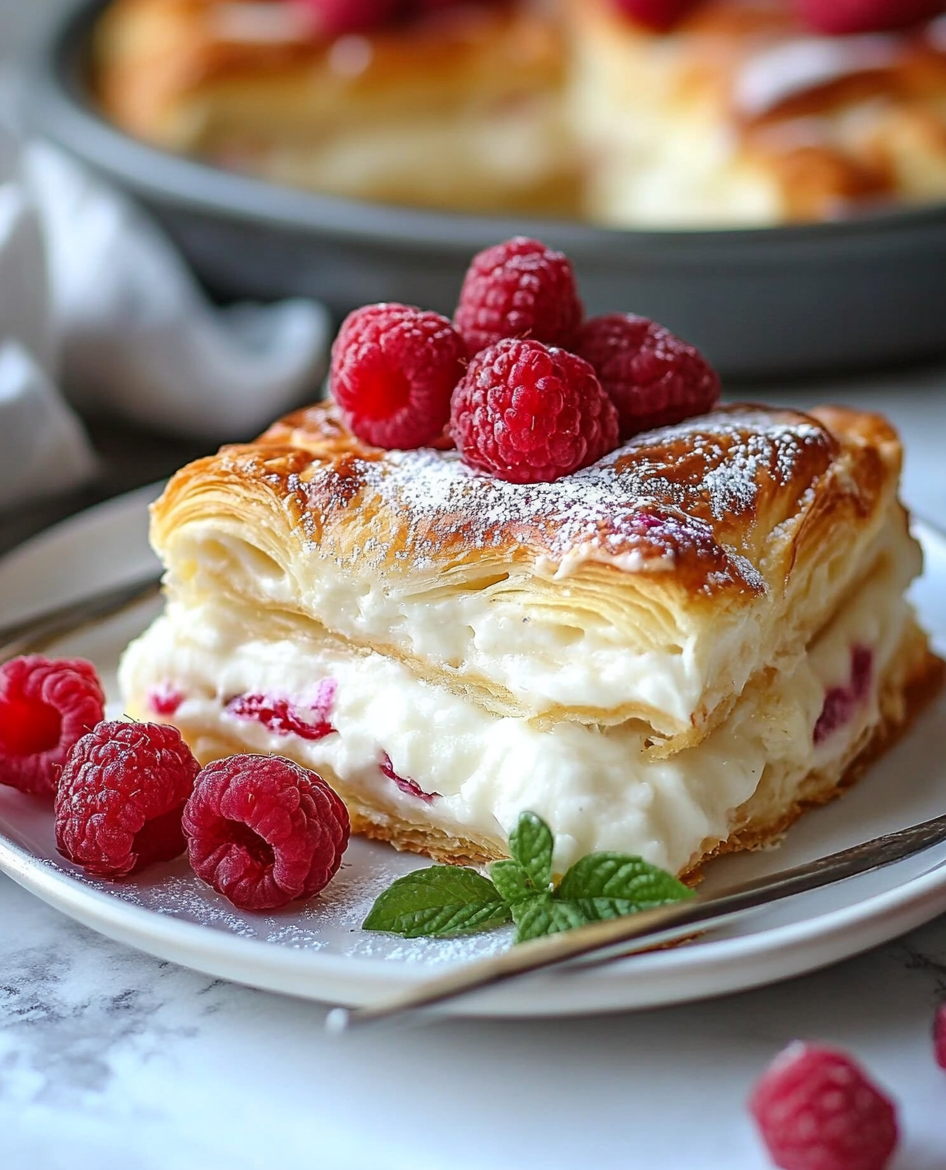
The Cheesecake Crescent Rolls Casserole is a delightful and easy-to-make dessert, featuring buttery crescent roll dough filled with a rich, creamy cheesecake filling. It is topped with a cinnamon-sugar mixture, which adds a sweet and slightly spiced crunch. This casserole combines the convenience of store-bought crescent roll dough with a homemade cheesecake filling, making it perfect for quick dessert preparations that are sure to impress at any gathering.
Ingredients:
- 2 cans of refrigerated crescent roll dough
- 2 blocks (8 oz each) of cream cheese, softened
- 1 cup of granulated sugar (plus 2 tbsp for topping)
- 1 tsp vanilla extract
- ¼ cup melted butter
- 1 tbsp ground cinnamon
Cooking Instructions:
- Preheat Oven: Set your oven to 350°F (175°C) and grease a 9×13-inch baking dish.
- First Dough Layer: Unroll one can of crescent roll dough and press it into the bottom of the dish, sealing the seams.
- Cream Cheese Filling: In a bowl, beat softened cream cheese, 1 cup of sugar, and vanilla until smooth. Spread evenly over the dough layer.
- Second Dough Layer: Unroll the second can of crescent dough and place it on top of the cream cheese mixture, sealing the seams again.
- Topping: Brush melted butter over the dough and sprinkle with the cinnamon-sugar mixture.
- Bake: Bake for 30 minutes, or until the top is golden and crisp.
- Cool and Serve: Allow the casserole to cool for 20 minutes before slicing and serving. Optionally, drizzle with honey for extra sweetness.
Tips and Variations:
- Add Fruit: Layer in fresh or preserved fruit like berries or apples for a fruity twist.
- Nutty Crunch: Sprinkle chopped pecans or walnuts on top before baking for added texture.
- Dairy-Free Option: Use dairy-free cream cheese and butter for a lactose-free version.
- Storage: Refrigerate leftovers for up to 5 days or freeze for up to 2 months.
Origins and Popularity:
This type of recipe is inspired by the Southern American tradition of using crescent roll dough in both savory and sweet casseroles. Crescent rolls, often sold as refrigerated dough, gained popularity in the mid-20th century for their versatility and convenience. The idea of turning them into a dessert with a cheesecake filling is a relatively modern twist, providing the perfect mix of buttery, rich, and creamy elements in one dish.
The Cheesecake Crescent Rolls Casserole has become a crowd-pleaser because of its ease of preparation and familiar flavors. It’s often served at potlucks, brunches, and family gatherings due to its comfort-food appeal.
Why This Recipe Works:
- Quick Prep: Using pre-made crescent roll dough drastically cuts down on prep time while still delivering a flaky pastry.
- Rich Cheesecake Filling: Cream cheese, sugar, and vanilla provide a rich and tangy filling reminiscent of classic cheesecake but without the fuss of making a traditional cheesecake.
- Cinnamon-Sugar Crunch: The cinnamon-sugar topping adds a delightful spiced sweetness and textural contrast to the soft cream cheese filling.
- Versatility: You can enjoy this casserole warm, fresh out of the oven, or chilled for a firmer texture. It works as both a dessert or a sweet breakfast item.
Tips for the Best Cheesecake Crescent Rolls Casserole:
- Softened Cream Cheese: Make sure the cream cheese is fully softened before mixing it with sugar and vanilla to create a smooth filling. This ensures a lump-free, creamy texture.
- Sealing the Crescent Dough: Press the seams of the crescent roll dough together to create a solid base and top layer, preventing any filling from leaking out while baking.
- Room Temperature Ingredients: Allow the cream cheese and dough to come to room temperature for easier handling and a more even bake.
- Baking Time: Keep an eye on the casserole as it bakes. The top should be golden brown and crisp, but not over-baked, to maintain a soft, creamy center.
- Cooling Time: Let the casserole cool for at least 20 minutes before cutting. This helps the layers firm up, making it easier to slice without the filling spilling out.
Serving Suggestions:
- Warm or Cold: You can enjoy this dish warm right out of the oven for a gooey, melty texture. Or, refrigerate it and serve chilled for a firmer, cheesecake-like consistency.
- Drizzle with Honey: For an extra touch of sweetness, drizzle honey or maple syrup on top before serving. This adds a luxurious layer of flavor to each bite.
- With Fresh Fruit: Pairing a slice of this casserole with fresh berries or a fruit compote adds a burst of freshness that complements the rich filling.
Storage and Reheating:
- Refrigerator: Store any leftovers in an airtight container in the fridge for up to 5 days. When reheating, you can microwave individual portions for 15-20 seconds to restore that warm, gooey texture.
- Freezer: If you’d like to save some for later, wrap the casserole tightly in plastic wrap and aluminum foil and freeze it for up to 2 months. Thaw it overnight in the refrigerator, then reheat in the oven at 350°F for about 10 minutes for the best texture.
Variations to Try:
- Fruit Additions: Incorporate fruit into the casserole for a fresh twist. You can layer fruit preserves, fresh berries, or sliced apples over the cream cheese filling. The fruit adds a lovely contrast to the sweetness and creaminess of the filling.
- Nutty Crunch: Add a sprinkle of chopped nuts such as pecans, walnuts, or almonds between the cream cheese filling and the top dough layer for a bit of crunch. This creates a more complex texture and flavor.
- Chocolate Lovers’ Version: Mix mini chocolate chips into the cream cheese filling for a chocolatey surprise in every bite. Alternatively, drizzle melted chocolate on top after baking for a rich finish.
- Spiced Up: For a more aromatic flavor, try adding a pinch of nutmeg, allspice, or cardamom to the cinnamon-sugar mixture. This will give the dish a warm, spiced flavor perfect for fall or winter gatherings.
- Healthier Options: If you’re looking to reduce sugar, substitute the granulated sugar with a natural sweetener like honey, maple syrup, or a sugar substitute. You can also use low-fat or dairy-free cream cheese to make it a lighter or vegan-friendly dessert.
Pro Tips:
- Press Seams Together: When spreading the crescent dough in the baking dish, make sure to press the seams of the dough together. This ensures the bottom layer doesn’t separate during baking and keeps the cheesecake filling intact.
- Even Layering: For the best result, make sure your cream cheese mixture is evenly spread. This will ensure each bite is filled with creamy, delicious filling.
- Cool Before Slicing: Allow the casserole to cool for about 20 minutes after baking to let the layers set. This makes it easier to slice into neat squares and ensures the cheesecake layer isn’t too runny.
Fun Facts:
- Crescent Roll Origin: Crescent rolls are inspired by traditional European croissants but are easier to make at home, thanks to their canned form. They’ve been a beloved convenience product in the U.S. since the 1960s.
- Cheesecake History: Cheesecake dates back to ancient Greece, with its evolution continuing through Roman times and into modern cuisine. The combination of creamy cheese, sugar, and vanilla creates a universally loved flavor that pairs well with many textures and toppings.
Conclusion:
The Cheesecake Crescent Rolls Casserole is the perfect blend of simplicity and indulgence, making it an ideal dessert for any occasion. Whether you’re serving it warm or chilled, this dessert offers a delicious balance of creamy, rich cheesecake filling with buttery, flaky crescent dough. Its versatility allows for endless customization, from adding fruits or nuts to sprinkling chocolate chips. Best of all, it’s incredibly easy to prepare, requiring minimal ingredients and time. This crowd-pleaser will quickly become a favorite in your home, offering comfort, sweetness, and a hint of nostalgia with every bite.